How To Root Galaxy Note N7000 Android 4 0 3 on XXLQ2 Firmware

Hello android lovers. today i will share about how to root galaxy note. if you want to install many games, cool apps and widget you need to have super user acces. because now there are only few apps and games you can install on your device if you doesnt have root acces. So now let me give you the tutorial
yesterday i have posted about how to update galaxy note to ICS XXLQ2 firmware. on those page you will able to update your galaxy note with the latest Ice Cream Sandwich firmware update that released by samsung.

how to root galaxy note

After you root you galaxy note N700 you will also can install the custom Rom firmwares as well as other apps which need the root access. And please notice This rooting process only can be applied to the Galaxy Note N7000 that installed by XXLQ2 ICS Android 4.0.3 Firmware and to no other devices as it may even brick the device. To check your firmware version in your device go to “Settings > About Phone”. on that section will appear your firmware version.

READ FIRST

Do with your Own Risk. We not responsible if you brick your device. becaues i have do this tutorial and everything is works good. so please read the instuction carfully.
And by root your note will also remove your warranty. to revoke the root acces you can do by install the official XXLQ2 firmware that i have mentioned above.

Now please prepare the file and requirements below.

before you start the root process of your galaxy note please backup all your important data on phone, such as : sms, contacts, etc using your favorite backup apps, to back up your APN and MMS Settings – Note down from the path “Applications > Settings > Wireless and Network > Mobile Networks > Access Point Names”.
Then you must enable your USB debugging mode from “Settings > Applications > Development > USB debugging”. and please look at your battery state, your battery state should be at least 60%. this to make sure your phone doesn’t get turned Off in the middle of firmware update process.

How to Root Galaxy Note N7000

  1. Download Odin and XXLQ2 Rooting Package and save it to your computer. Then extract the file
  2. Open Odin on your PC/laptop.
  3. turn off your device, so that your device can enter to the the download mode. to enter download mode by pressing Volume Down + OK button, and holding both simultaneously press the Power Button. then a message will be appear when you need to press Volume Up key to continue enter to the the Download Mode.
  4. Connect your device to computer via USB data cable. After connecting, the ID : COM square in odin will turn Yellow. it means that all the drivers have been successfully installed.
    Note: If on section ID : COM doesn’t turn to Yellow color, you must to disconnect your device then go to the “Settings > Wireless & Network > USB Settings” and ensure that “Samsung KIES” option is checked before connecting the phone to the computer.
  5. Then connect your device again and click on “PDA” to select “CF-Root-SGN_XX_XEU_LQ2-v5.6-CWM5.tar” then click the “Start” button to start the rooting process. wait for a couple of minutes
  6. after your device succesfully rooted, your device will be restarted and after you see language preferences setting, then disconnect your galaxy note.


Finish. that is for tutorial root Galaxy Note N7000 on XXLQ2 ICS 4.0.3 firmware. please comment if you need any further assistant.
Read More..

Tutorial Restore Eee Pad Transformer TF101 To Original Firmware

Today comes the long awaited update to Android 4.0 ICS for the excellent Asus tablet the Eee Pad Transformer TF101. To complete the upgrade to Android Ice Cream sandwich or also known as ICS, please note that you will need the original firmware version installed on your asus tablet and not a custom rom / custom firmware because otherwise it will be impossible to update to the latest Android release, issued by the Asus company. So to update to android ics you first must flash orirginal stock rom if you have installed custom rom before.

restore eee pad transformer tf 101 to original rom

Now below i will show you in a few simple steps to restore to original rom factory default rom for Eee Pad Transformer TF101:

Requirements


  • Download the official update from Asus site
  • Have at least 1 Gb MicroSD
  • The tablet can have any ROMs.
  • please note when you do this it will also delete your phone memory so you must backup all your phone data
  • Do nandroid Backup just in case if anything goes wrong you can change back to your latest state.


Restore Eee Pad Transformer TF101 To Factory Default ROM 

  1. Once you have downloaded the firmware, unpack it and you will have a new folder called ASUS.
  2. Copy this folder in MicroSD.
  3. Reboot into Recovery.
  4. Made various wipe partition, wipe cache, and dalvik
  5. Install the previously copied to the SD file, which is located in ASUS.
  6. Reboot and you will have the initial installation as if it had been switched on for the first time.

Once you have done all these steps above, then finally youll be able to update Transformer TF101 to Ice Cream Sandwich.
Read More..

How To Setup And Configure Google Now

In a previous of couple weeks ago i have discuss in this blog about Android Jelly bean new features. and on that post i have mentioned if the new features that most wanted on jelly bean is google now. And today i will tell you How to setup Google Now which is one of the most highlighted features of Android 4.1 Jelly Bean. So you must have a question on your mind, what is Google Now and how to setup or configure it? Check out my answer below.

What is Google Now

Google Now is an application that created to answer your questions and support them through search results. I can sat that Google Now is an application to automate your life and make it easier. Although it is just an application but it is very usefull
what is google now

Google Now can tell you about the weather, so when one day you will come out google now can tell you the weather before you going outside. It can tells you how much traffic on the street. its very usefull to expect the jam on the traffic so you can choose the way if you want to go anywhere without trapped on traffic jam. this apps also can tell you when can you get next train or plane while you are on the platform or airport area. And Amazingly Google Now can tells all those things automatically on your smartphone which appear throughout the day whenever you need them.


How to Setup Google Now

How to setup Google Now is not a very complex question. so please read my insctruction to setup google now
To setup it, first launch the apps. Google Now can be launched by 2 methods, you can laundh from the lock screen by swiping towards the Google icon. or the 2nd methods is by swiping up from any of your soft keys.
how to configure google now

If you were in the first time launchine google now. just tapping through the welcome screen set up.
Then Scroll down and then menu button its present in the bottom right corner. Once you tap the menu button it will launch Google Now/Voice Search Settings. then tap it customize your cards.
:how

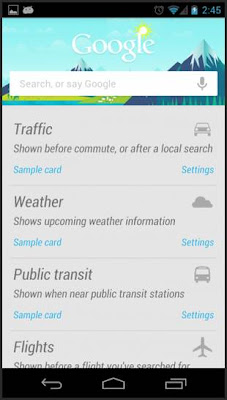
If you want, you also can view some sample cards and configure it from Google Now home screen. to do so, you just simply scroll down to the bottom and then tap on “Show sample cards”.
tutorial configure google now

If you you want to customzie it later and just want to know the taste of Google Now then you just leave the settings to default. After you are finished setup the cards, you need to fill it with some data. to do so, you can use Voice Search and then search for your weather, favourite sports team, place for hangout or anything that related to the sample cards.

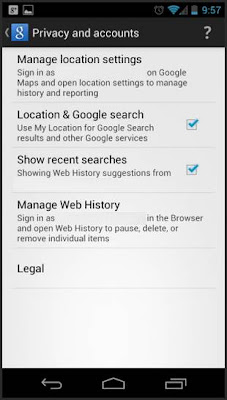
If you curious and want to get full benefitted then go back to Google Now settings and go to Privacy accounts. You can find that in default mode all of the settings are checked.
Google-Now-Privacy-Accounts-settings

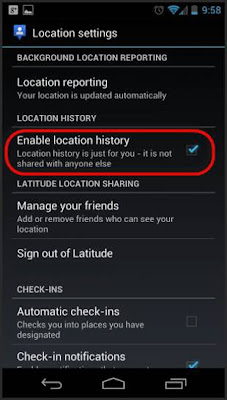
To manage your map setting Tap o Manage Location Settings. To get the best experience, check the option for “Enable Location History”.

google now location history setting

To activate your Google Now apps in identifying your home and work address correctly, go to Location History in there you will get the option, it the option you must configure your home and work correctly.

OK, now your Google Now apps is fully enabled and ready to show you some cards. You will start getting cards for work/home distance, weather today, and other locations thfat you have set. If you still interested in any other cards, then you just use Voice Search that i have told previously. It will help Google Now to understand that you are interested in those cards also. And Google Now will keep on cellecting information as soon as you put new setting and information.


Google Now Tips and Tricks


  • When once your Cards closed or swiped away from Google Now or notifications are not gone. dontt worry. They will reappear as soon as if there are a change on the data.
  • But if You want to make the cards reappear without wait a change on the data, just simply tap the menu icon at Google Now and then tap on refresh button. But if you still face the problem, then turn Google Now switch off, reboot your phone and then re-enable it.
  • If you want to configure Google Now to notify you when to leave so as to arrive on time. Just go to your calendar, then just add locations.
  • To improves Google Now functionality. You can do it by enabling web history immensely, and you control its setting from – www.google.com/dashboard
Read More..

How To Upgrade Samsung Galaxy Mini to Gingerbread 2 3 7

ok now let me share another tutorial upgrade for galaxy mini. it is been a long time i didnt post any tutorial for galaxy mini. then because one of tutorial for android blog subscriber ask me to post tutorial flash gingerbread 2.3.7 for galaxy mini i will do it now :D
Before we start maybe you want to read my previous tutorial upgrade galaxy mini to gingerbread 2.3.4. To install gingerbread 2.3.7 at least you must at gingerbread version. you can just install it directly. 2.3.7 is the latest version of gingerbread for galaxy mini and sure if it is more stable and fast compared then the another prevoius version. Now before we start the tutorial installation guide you must prepare the requirements.


upgrade galaxy mini to android 2.3.7


Requirements


After you have download all the file above then lets go ahead to the instruction

Flash Clockworkod Recovery

skip this section if youve installed the CW

  1. Download: TASS-recovery-cwm.tar
  2. Run S5570_Odin Multi Downloader v4.38.exe
  3. Select Options TASS.Ops in OPS
  4. Check the One Package
  5. Select-recovery-Tass cwm.tar the One Package
  6. Click Start and wait until the Finish
  7. then wipe data / factory reset


How To Upgrade Gingerbread 2.3.7 for Galaxy Mini
  1. Download and copy ROM CM7 RC 5.2 to your  SD Card. remember place it on the outside
  2. Reboot and go into Recovery Mode
  3. Select install zip from sd card - choose zip from sd card find  ROM CM7 RC 5.2 that has been placed on the SDCard - Select Yes - Install update
  4. Wait for it to finish and reboot
  5. Wipe the HP and reboot
  6. done


Now you have successfully upgrade galaxy mini to gingerbread 2.3.7 . please comment if you need some further assistant. see you in next tutorial for android post
Read More..

NSFW Lady Offers to Harvest Virginity of Net Neutrality Supporting Nerds

This summary is not available. Please click here to view the post.
Read More..

Blog Archive

Powered by Blogger.